이번 글에서는 커맨드 패턴에 대해 설명하겠습니다.
커맨드 패턴은 요청(행위, 행동)을 객체로 캡슐화해서 요청을 매개변수화하는 패턴이다. (행동 패턴)
주로 요청을 보낸 객체와 요청을 수행하는 객체를 분리하고 싶을 때 사용한다.
에디터의 실행 기록을 저장하며 [redo/undo]를 구현하거나, 작업 큐를 구현하는데 많이 사용된다.
커맨드 패턴은 다음과 같은 요소들로 이루어져 있다고 보면 된다.
커맨드 객체 : 실제 실행될 동작을 구현한 클래스로 "리시버"의 메서드를 실행하는 객체이다.
리시버 객체 : 실제로 작업을 수행하는 객체이다.
인보커 객체 : 커맨드를 실행하는 주체이다.
클라이언트 : 커맨드 객체를 생성하여 인보커에 할당한다.
그리고 그 상관관계를 그림으로 나타내 아래와 같다.

커맨드 패턴을 설명만 들어서는 감이 안올 것 같다. 그래서 아래 간단한 요구사항을 커맨드 패턴으로 구현해보자.
요구사항
스위치
전원을 on/off하여 전등을 끄고 킬 수 있다.
// Receiver: 실제 동작을 수행하는 객체class Light { on() { console.log("💡 불이 켜졌습니다."); } off() { console.log(" 불이 꺼졌습니다."); }}// Command 인터페이스 (Invoker는 인터페이스에 의존하여 Command 객체 구현은 모름)interface Command { execute(): void;}// Concrete Command: 불 켜기class LightOnCommand implements Command { constructor(private light: Light) {} execute() { this.light.on(); }}// Concrete Command: 불 끄기class LightOffCommand implements Command { constructor(private light: Light) {} execute() { this.light.off(); }}// Invoker: Command를 실행하는 객체class RemoteControl { private command: Command | null = null; setCommand(command: Command) { this.command = command; } pressButton() { if (this.command) { this.command.execute(); } }}/* 사용 예시 */const light = new Light(); // 리시버 (동작 구현체)const lightOn = new LightOnCommand(light); // on 커맨드const lightOff = new LightOffCommand(light); // off 커맨드const remote = new RemoteControl(); // 인보커 (스위치)// 불 켜기remote.setCommand(lightOn); // 인보커는 on 커맨드를 실행하도록 변경remote.pressButton(); // 💡 불이 켜졌습니다.// 불 끄기remote.setCommand(lightOff); // 인보커는 off 커맨드를 실행하도록 변경remote.pressButton(); // 💡 불이 꺼졌습니다.위와 같은 패턴이 command 패턴이다. 그런데 사용 예시를 보면 사용전에 인보커가 사용전에 커맨드를 갈아껴줘야 하는 것을 볼 수 있다. 이걸 개선할 수 있는 방법은 구현에 따라 다양해질 수 있을 것 같다.
위 코드의 command 패턴 개선 방안 예시
리시버가 on/off 상태를 갖고 리시버가 상태에 맞는 toggle을 수행한다. (1 인보커, 1 커맨드, 1리시버)
가장 직관적이지만, 리시버가 (상태 + 행동 전환)의 책임을 모두 가져 책임이 많아 보인다.
리시버가 on/off 상태를 갖고 커맨드가 상태에 맞는 toggle을 수행한다. (1인보커, 1커맨드, 1리시버)
리시버가 단순해지지만, 커맨드가 리시버 구현을 더 잘 알아야해서 결합도가 증가.
2개의 인보커가 있고, 각각 on과 off 커맨드를 담당한다. (2인보커, 2커맨드, 1리시버)
행동 전환이 필요 없어지고, 단일 책임 원칙이 깔끔해지지만, 커맨드가 늘어나면 인보커도 늘어나 관리가 힘들어짐.
1개의 인보커가 on도 수행할 수 있고, off도 수행할 수 있다. (1인보커, 2커맨드, 1리시버)
인보커가 복잡해 지지만, 확장은 커맨드만 추가만 하면 되서 확장이 용이.
그러면 어떤 방법이 좋을까?? 각각 장점과 단점을 고루 갖고있어 상황에 맞게, 구조에 맞게 사용해야 한다고 생각한다.
리시버 없이 구현 로직을 커맨드에 구현하는 커맨드도 있다. "스마트 커맨드"라고 한다. 하지만 Head First 디자인 패턴 책에 따르면 "더미" 커맨드 객체를 추천한다. 커맨드 패턴의 목표가 리시버와 인보커이기 때문이다. 왜냐하면 "스마트" 커맨드 객체면 강한 결합을 갖게되고 재사용성이 떨어지기 때문이다.
2번 방법과 4번 방법의 예시 코드 일부를 소개하겠다.
2번 방식
// 2번 커맨드가 행동 전환 책임을 가지는 경우// Receiverclass Light { private isOn = false; on() { this.isOn = true; console.log("💡 불이 켜졌습니다."); } off() { this.isOn = false; console.log(" 불이 꺼졌습니다."); } getState() { return this.isOn; }}// 행동 전환 책class LightToggleCommand implements Command { constructor(private light: Light) {} execute() { if (this.light.getState()) { this.light.off(); } else { this.light.on(); } }}/* 사용 예시 */const light = new Light();const toggleCommand = new LightToggleCommand(light);const remote = new RemoteControl();remote.setCommand(toggleCommand);// 토글식으로 켜졌다 꺼졌다 동작remote.pressButton(); // 💡 불이 켜졌습니다.remote.pressButton(); // 불이 꺼졌습니다.remote.pressButton(); // 💡 불이 켜졌습니다.4번 방식
// Receiverclass Light { on() { console.log("💡 불이 켜졌습니다."); } off() { console.log(" 불이 꺼졌습니다."); }}// Concrete Commandsclass LightOnCommand implements Command { constructor(private light: Light) {} execute() { this.light.on(); }}class LightOffCommand implements Command { constructor(private light: Light) {} execute() { this.light.off(); }}// Invokerclass RemoteControl { private commands: Record<string, Command> = {}; setCommand(name: string, command: Command) { this.commands[name] = command; } pressButton(name: string) { const command = this.commands[name]; command.execute(); }}/* 사용 예시 */const light = new Light();const lightOn = new LightOnCommand(light);const lightOff = new LightOffCommand(light);const remote = new RemoteControl();remote.setCommand("ON", lightOn);remote.setCommand("OFF", lightOff);remote.pressButton("ON"); // 💡 불이 켜졌습니다.remote.pressButton("OFF"); // 불이 꺼졌습니다.커맨드 패턴은 에디터 Undo/Redo 동작, 매크로 동작(여러 커맨드를 순서대로 실행하게), 작업 큐, 로그, 게임 입력 처리등 다양하게 사용된다. 특히 게임을 예시로 들면 어떤 스킬이 3초 전 상태로 돌아가야한다고 하면 커맨드 패턴으로 입력 커맨드를 3초까지 모두 기억하여 3초 상태로 돌아가게 할 수 있다.
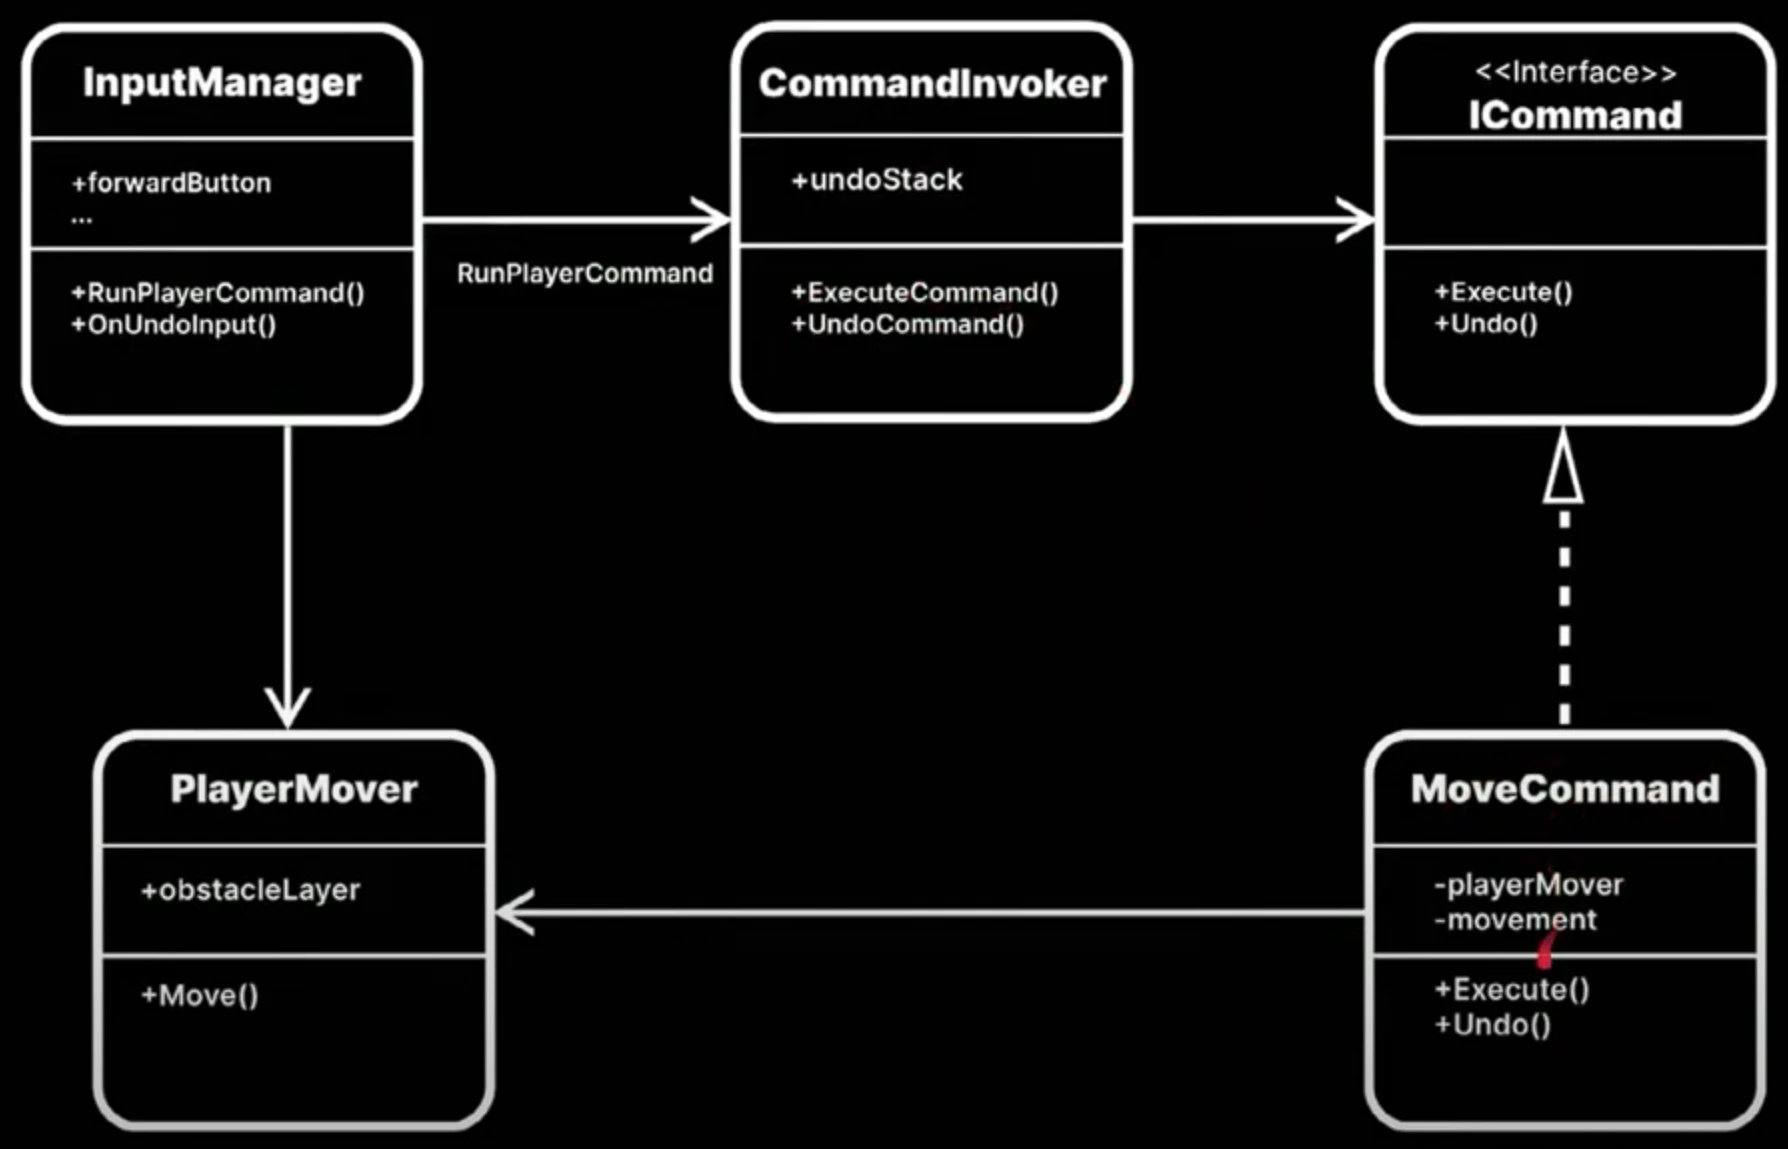
Unity에서 게임 프로그래밍에서 커맨드 패턴을 어떻게 사용해주는지 설명해주는 유튜브 영상을 참고하여 예시를 보여주겠다. 아래 그림은 캐릭터가 움직일 때 커맨드 패턴을 사용한 예시다(차타면서도 듣고 4번 넘게 시청하는 것 같다!!). 실전과 가장 가까운 코드이지 않을까??
클래스 다이어그램 | 설명 |
 |
PlayerMover는 게임 캐릭터라고 보면 된다. InputManager는 Player1에 커맨드를 실행할 수도 있고 Player2에 커맨드를 실행할 수도 있을 것이다. |
이제 위 다이어그램의 구현 코드 예시를 살펴보자.
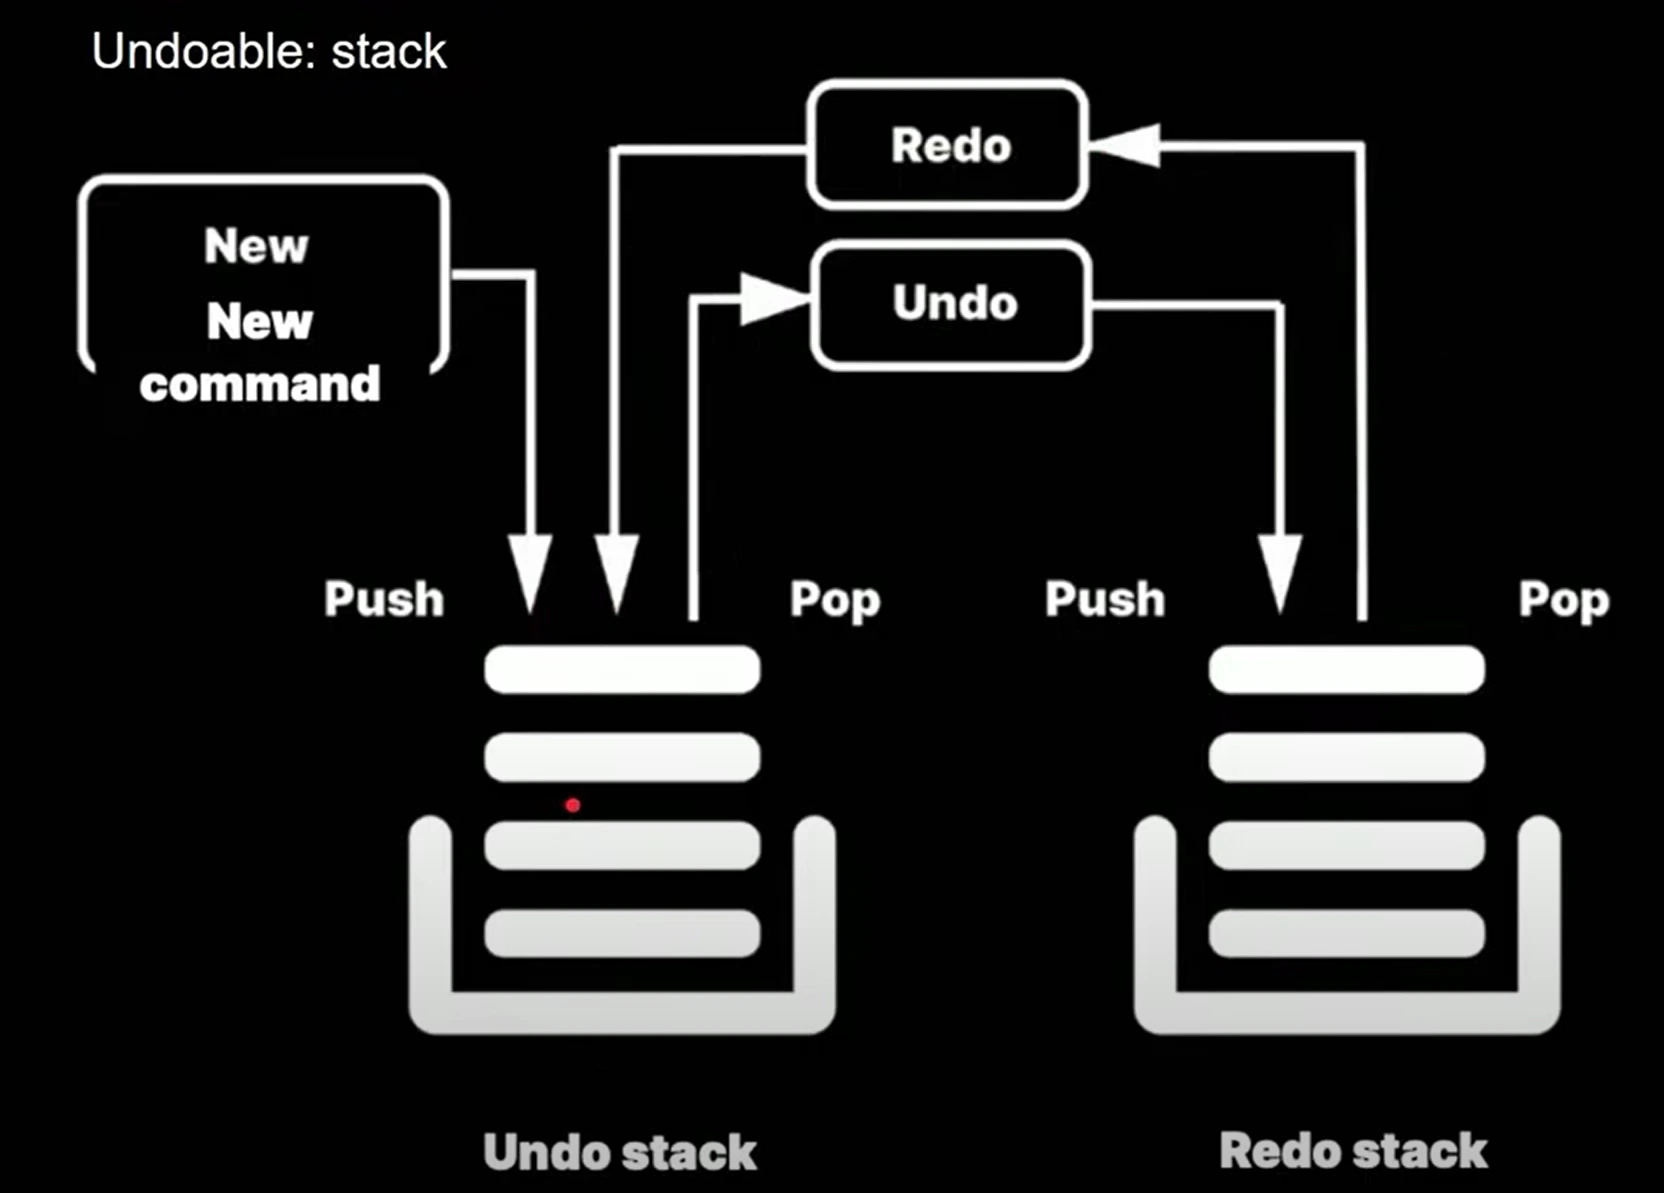
public interface Command { public void Execute(); public void Undo();}public class MoveCommand:Command { private PlayerMover playerMover; private Vector3 movement; public MoveCommand(PlayerMover player, Vector3 moveVector) { this.playerMover = player; // 플레이어 정보 (리시버) this.movement = moveVector; // 이동 벡터량 } public void Execute() { playerMover.move(movement); } public void Undo() { playerMover.move(-movement); // -만큼 이동 }}이제 게임에서 어떤 커맨드에 대해서 어떻게 undo/redo를 구현할 지에 대한 설명과 코드다.
클래스 다이어그램 | 설명 |
 |
|
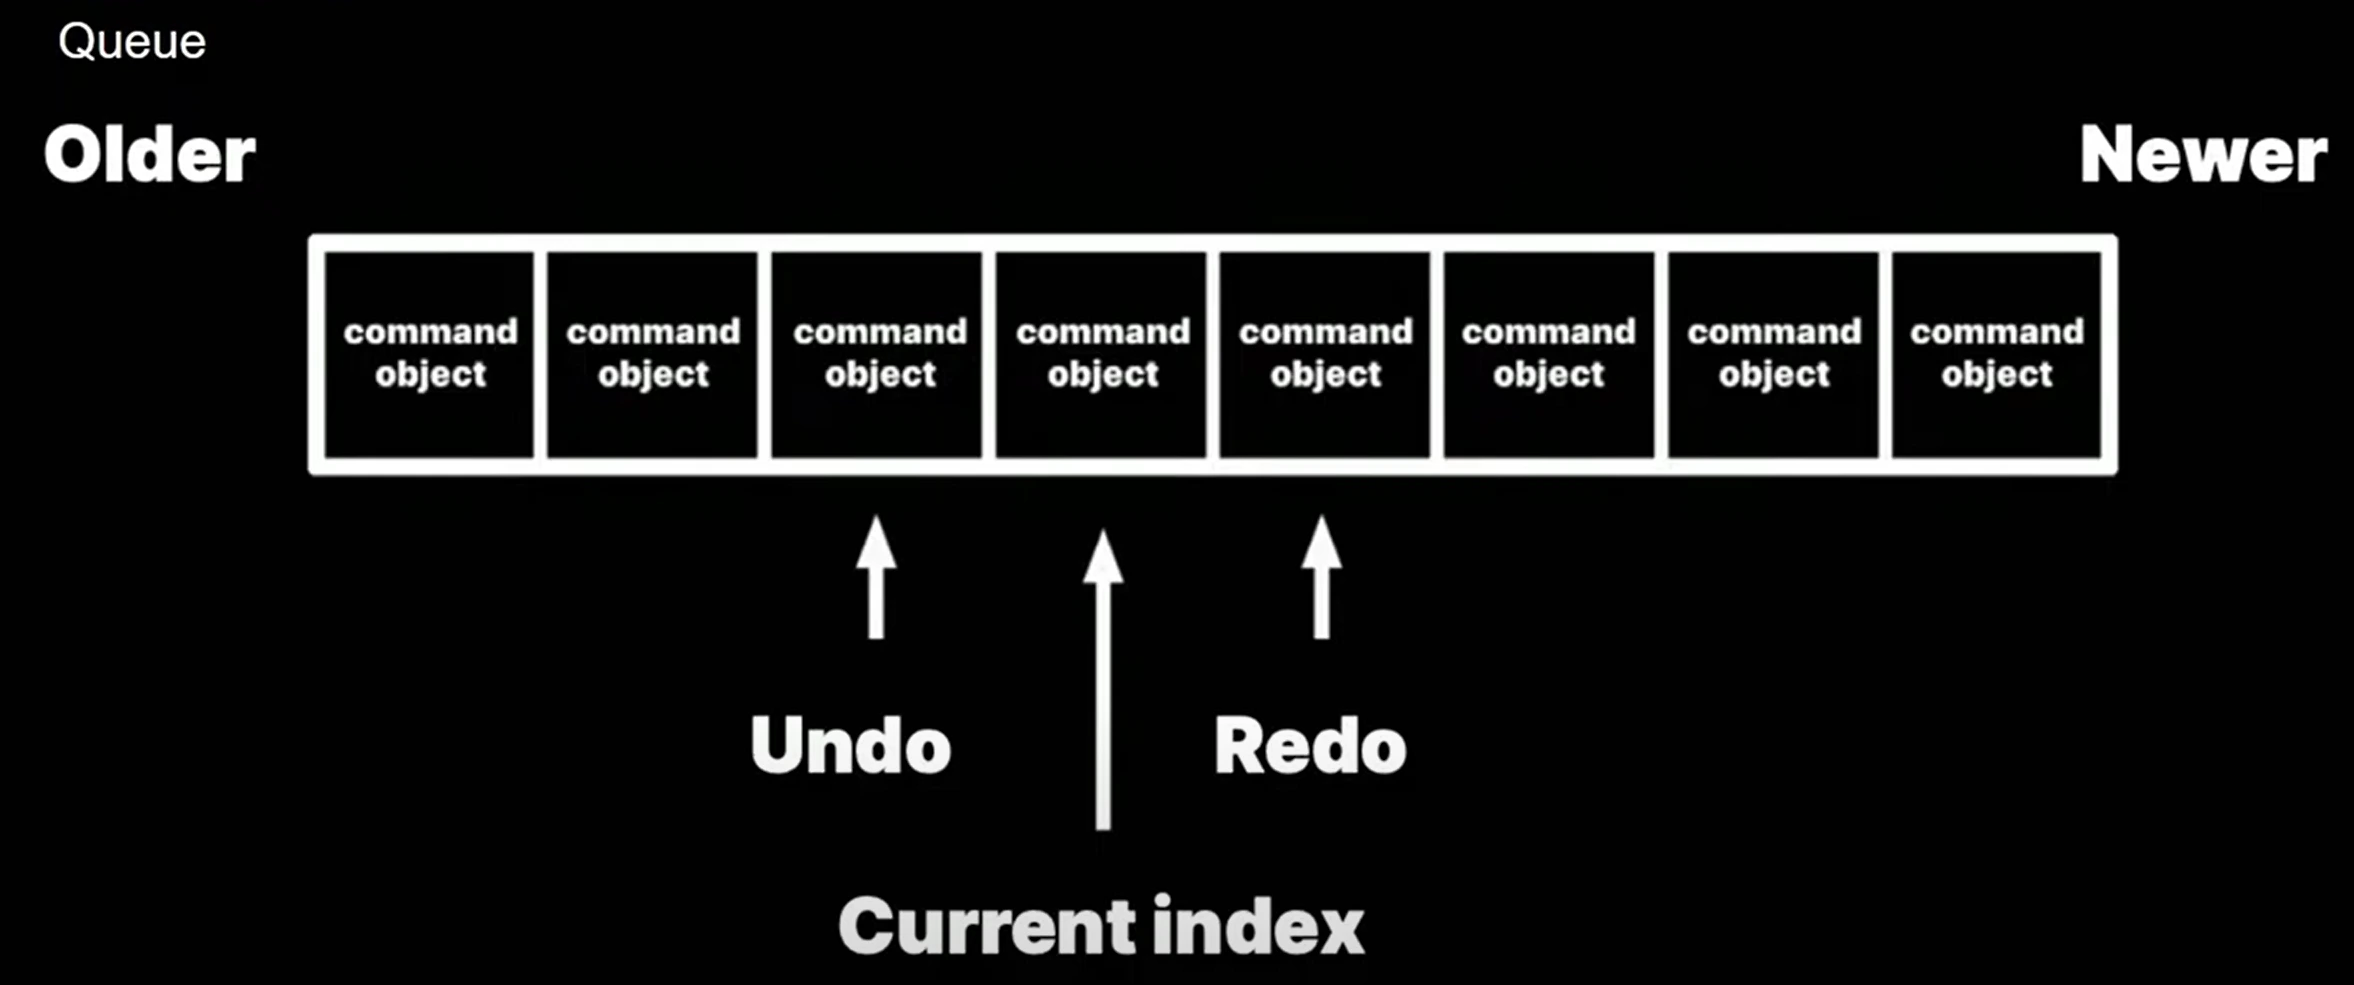
// 인보커에 이력을 쌓는다. (인보커가 command를 실행을 유발하니까)public class CommandInvoker{ private static Stack<Command> undoStack = new Stack<Command>(); // 실행 취소 스택 private static Stack<Command> redoStack = new Stack<Command>(); // 실행 취소를 취소 스택 public static void undoCommand() { // 실행 취소하면, 최근 커맨드를 undo하고 redo스택에 넣기 if(undoStack.count > 0) { Command activeCommand = undoStack.pop(); redoStack.push(activeCommand); activeCommand.undo(); } } public static void redoCommand() { // 실행 취소를 취소하면, 최근 undo한 커맨드를 다시 execute하기. if(redoStack.count > 0) { Command activeCommand = redoStack.pop(); undoStack.push(activeCommand); activeCommand.execute(); } } public static void executeCommand(Command command) { command.execute(); undoStack.push(command); redoStack.clear(); // 새롭게 명령을 수행하면 redo는 비우 }}public class InputManager { Button forwardButton; Button backButton; Button leftButton; Button rightButton; Button undoButton; Button redoButton; private PlayerMover playerMover; private CommandInvoker commandInvoker private void Start() { forwardButton.onClick.addListener(onForwardInput) backButton.onClick.addListener(onBackInput) leftButton.onClick.addListener(onLeftInput) rightButton.onClick.addListener(onRightInput) undoButton.onClick.addListener(onUndoInput) redoButton.onClick.addListener(onRedoInput) } private void runPlayerCommand(PlayerMover playerMover, Vector3 movement) { if(playerMover.isValidMove(movement)) { Command command = new MoveCommand(playerMover, movement); // A플레이어가 x만큼 이동 커맨드 commandInvoker.executeCommand(commane); } } private void onLeftInput() { runPlayerCommand(player, Vector3.left); } private void onRightInput() { runPlayerCommand(player, Vector3.right); } private void onUndoInput() { commandInvoker.undoCommand(); } ...}그런데 undo/redo는 stack 2개를 사용할 수도 있지만 queue로 구현할 수 있다.
클래스 다이어그램 | 설명 |
 |
|
아래가 어떤 식으로 큐에서 콤보를 찾아서 콤보를 실행하게 하는지 예시 코드다. (큐로 어떻게 undo, redo를 하는지 코드는 아니다.) 간략하게 설명하면 팩토리 패턴+ 커맨드 패턴의 조합이며, 캐릭터별 콤보 커맨드의 알고리즘은 팩토리 패턴으로 만들어지며 커맨드 패턴들을 큐에서 확인하여 콤보를 생성하는 코드다.
public class ButtonActionController { private GameplayActionCommandInvoker actionInvoker; private ComboActionQueueManager queueManager; private void handleXButtonCommand() { var xButtonCommand = new XButtonActionCommand(); addToComboSequence(xButtonCommand); executeActionCommand(xButtonCommand); } private void addToComboSequence(GameplayActionCommand command) { queueManager.addCommand(command); } private void executeActionCommand(gameplayActionCommand command) { actionInvoker.executeCommand(command); }}public class ComboMatchEngine { private ComboActionQueueManager actionQueueManager; // 큐 관리 private ComboActionCommandFactory comboActionCommandFactory; // 캐릭터에 맞게 엔진에 팩토리 끼어넣기 private List<ComboRule> comboRules; // 큐에서 콤보룰에 valid한 것 찾으면 command 반환하는 객체 // 캐릭터에 맞는 콤보 추가 private void initializeComboRules() { comboRules = new List<ComboRule>( // 기능 확장에 커맨드만 추가하면 되니 OCP 준수. new ComboXXY(comboActionCommandFactory), new ComboDownRightA(comboActionCommandFactory) // 팩토리 패턴, 캐릭터에 맞는 팩토리가 들어갈 것으로 예상 ) } // 콤보인 커맨드 큐에서 찾기 private GameplayActionCommand checkSequenceForCombo(Queue<GameplayActionCommand> comboSequence) { for(int startIndex = 0; startIndex <= comboSequence.count; startIndex++) { var subsequence = GetSubsequence(comboSequence, startIndex); foreach(ComboRule rule in comboRules) { if(rule.isMatch(subsequence)) { return rule.getResultingComboCommand(); // 콤보 찾으면 Command 반 } } } return null; // 없으면 null }}public class ComboDownRightA : ComboRule { public bool isMatch(Enumerable<GameplayActionCommand> sequence) { var sequenceArray = sequence.tak(combolength).toArray(); var first = sequenceArray[0]; var second = sequenceArray[1]; var third = sequenceArray[2]; return first === DPadDownActionCommand && second === DPadRightActionCommand && third === AButtonActionCommand; } public GameplayActionCommand getResultingComboCommand() { return comboActionCommandFactory.createAdokenCommand(); }}public class comboActionQueueManager { private ComboActionCommandFactory comboActionCommandFactory; private Queue<GameplayActionCommand> comboSequece; private ComboMatchEngine comboMatchEngine; private void awake() { comboSequence = new Queue<GameplayActionCommand>(); comboMatchEngine = new ComboMatchEngine(this, comboActionCommandFactory); } private void enqueueCommandAndResetTimers(GameplayActionCommand command) { comboSequence.enqueue(command); if(isFirstCommandInSequence()) { timeSinceFirstComboInput = 0; } timeSinceLastComboInput = 0; }}커맨드 객체의 쉬운 버전과 실전 버전까지 구현 코드를 보면서 그 장점과 단점을 봤을 것 같다. 장단점으로 정리하고 끝내겠다.
장점
요청을 커맨드 객체로 캡슐화 하여 명령을 실행하는 리시버와 명령을 내리는 인보커가 분리(SRP)
새로운 명령을 추가할 때 기존 코드의 수정없이 새로운 concreateCommand 클래스 추가하면 됨(OCP)
클래스간 결합도를 낮춰 명령을 추상화하여 코드의 유연성과 재사용성 높아짐
큐에 저장하거나 로그 기록 등 처리가 가능.
실전처럼 동일한 명령에 대해 다양한 매개변수를 사용하여 명령을 더 유연하게 정의 가능
단점
실전편을 보면 구조가 매우 복잡해지는 것을 볼 수 있다. (커맨드 패턴만해도 Command, Recevier, Invoker로 벌써 3가지로 나뉨.
명령마다 별도의 Command 추가하여 클래스 수 증가.
명령 객체 생성 및 관리 오버헤드