
Contents (11)
Blog Introduction – Editor
Hello. This is my first blog post.
I made this blog to record and share the things I've wrestled with and solved while programming. I'm not the best writer, but I'll keep revising and improving my posts so I can share knowledge efficiently.
In this post, I'd like to introduce the blog editor I built myself.
I tested all kinds of editors for nearly a month and finally went with Tiptap, which is based on ProseMirror.
Tiptap:
Is highly extensible
Can SSR the Viewer in both JSON and Text formats
Works well with Next.js & the backend
Editor | SSR | Extensibility | Engine | WYSIWYG | Markdown | RIch Text | Notes |
|---|---|---|---|---|---|---|---|
editor.js | 🟡 | ↗️ | Own | ✅ | 🟡 | ✅ | Good docs. JSON structure. |
react-md-editor | ❌ | ➡️ | Own | ❌ | ✅ | ❌ | Poor WYSIWYG usability. |
toast UI | ❌ | ⬇️ | ProseMirror | ✅ | ✅ | ✅ | Poor documentation. Few plugins. |
quill | 🟡 | ↗️ | Delta | ✅ | 🟡 | ✅ | Good docs. JSON structure. |
TipTap | ✅ | ↗️ | ProseMirror | ✅ | 🟡 | ✅ | Average docs. Features are well separated. |
ProseMirror | ✅ | ⬆️ | Own | ✅ | ❌ | 🟡 | Excellent docs. Steep learning curve. |
👉 Conclusion: if you mostly need simple features, I recommend Quill/Editor.js. But if you need a lot of custom features, Tiptap/ProseMirror is probably the best choice.
1. Defining the Features
I put together a list of the features my editor needed.
Basic text editing
Font styling (bold, underline, italic, color, background color)
Bulleted lists, numbered lists, checklists
Left, right, and center paragraph alignment
Markdown syntax support (typing # followed by a space gives you an h1 tag... typing ```js automatically creates a JS code block)
Indent and outdent
Creating hyperlinks
Server-side rendering of the Viewer
The Viewer supports server-side rendering (SSR), so it can be cached with Next.js ISR and SSG
Code blocks and code highlighting
Syntax highlighting that matches the programming language set on the code block
The Code Syntax Highlighter supports SSR, so it can be cached with Next.js ISR and SSG.
Adding formatting (highlighter, underline, etc.) on top of the default syntax-highlighted code.
Code copied from VS Code automatically gets a code block with the file's language detected
Image upload and management
Support for image alignment and resizing
Conveniently upload to S3 on copy-paste and use the returned URL
On upload, compress to WebP, compare the results, and use the more efficient format.
Reuse existing image URLs to avoid unnecessary uploads.
Automatic table of contents (TOC)
Automatically generate a table of contents (TOC) from the headings
Slash commands and drag autocomplete
Typing "/" gives you access to the main features.
Dragging over content lets you use the features you need on the selected area.
2. Feature Overview
I'll briefly go over what was hard about implementing these six features and how I implemented them.
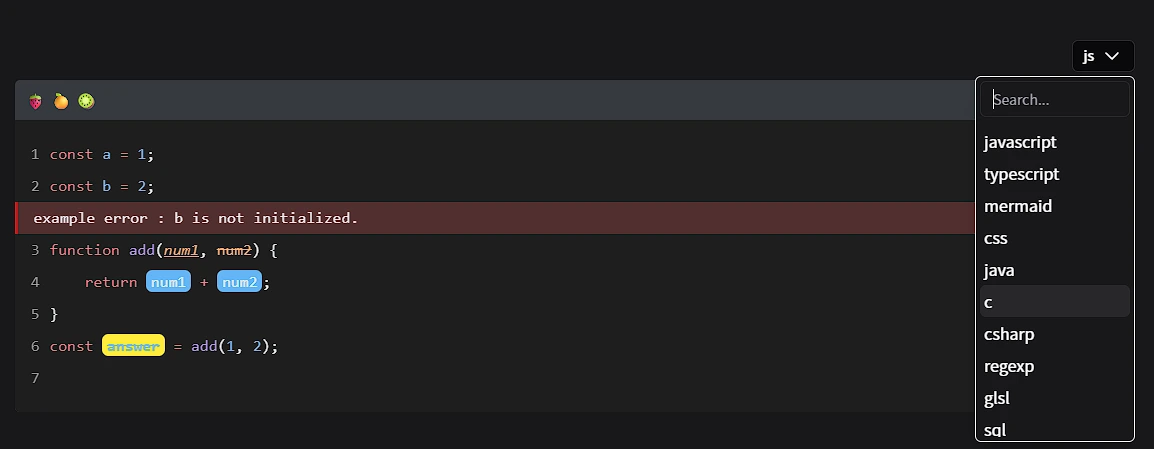
2.1 Code Syntax Highlighter
Why I built it: It's a dev blog, so highlighting code in lots of languages is a must
Implementation: Based on Shiki, supports 100+ languages, parses line by line → line numbers are possible
Features: Marks like highlighter, underline
, and strikethroughcan also be applied inside code blocks. Automatic language detection when copy-pasting from VS Code.Challenge: Resolving ProseMirror Schema/Mark conflicts → took more than 2 weeks
Result: Works as one with the editor (linked to the editor context), no need to store the data twice
2.2 Server-Side Rendering of the Viewer
Why I built it: Fast rendering through Next.js ISR/SSG caching
Approaches I came up with:
Sending HTML from the client → may be insecure.
Parsing and sanitizing the data with SSR on the server → always up to date, safe
Implementation: Storing the data on the server + caching the parsed HTML alongside it → fast output and safe
Benefits: Stronger security, no need to store data twice
2.3 Image Upload

Why I built it: I needed real-time image uploads to S3 storage.
Implementation: Paste from the clipboard → WebP compression → upload to S3 and return the URL
Challenge: Figuring out how to handle external URLs and how to configure CSP
Benefit: Reusing existing URLs → prevents duplicate uploads
2.4 Basic Text Editing Features
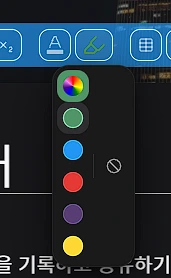 |  |
Implementation: Developed plugins for Tiptap following its plugin format
Challenge: To add a feature, you have to dig into the ProseMirror docs as well.
Benefit: I can expand my freedom to customize at any time just by adding features.
2.5 TOC

Why I built it: I was jealous of the way Namuwiki lets you jump around using its table of contents.
Implementation:
Added data attributes for the TOC to the Heading plugin and used them for parsing.
Detected layout changes with ResizeObserver and optimized it with debouncing.
Challenge: Since it's implemented by parsing, it's hard to maintain unless you know how the editor's Heading plugin is implemented.
Benefit: You can see the table of contents at a glance and find what you're looking for.
2.6 Slash Commands and Drag Autocomplete
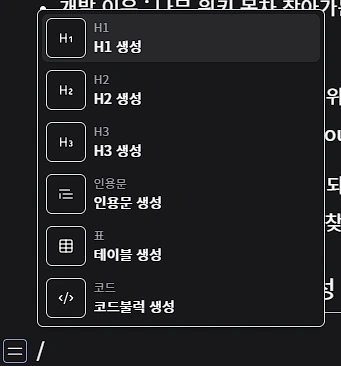 | 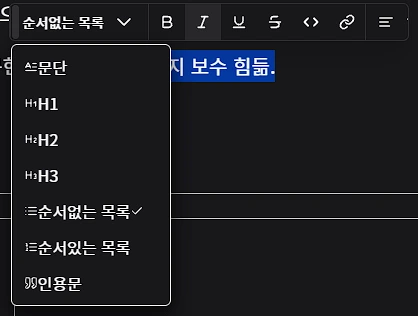 |
Why I built it: Looking at the Notion editor as a reference, it seemed good enough.
Implementation:
Luckily, there was a basic plugin for this, so I used it
Added the custom features I wanted to the plugin.
Challenge: I had to go through all the Commands and add them, but since the code block was a feature I built from scratch, I had to add its commands myself.
Benefit: It's nice not having to move the mouse all the way up to the control box.
3. Other Features
3.1 Iframe (CodePen)
Why I built it: Someday I'll need to show code actually running, and I thought CodePen would be a good way to do that.
Implementation:
Since an iframe can cause security issues, I configured CSP appropriately.
Challenge: Since it's entirely third-party, it's heavily affected by CSP, but it's hard to test in a real environment.